A smash‑and‑grab on the cigarette wall can empty a week’s profit in seconds, yet most stores still rely on flimsy MDF shelves and a quick glance from the cashier. Readers who manage a high‑traffic shop need practical moves that stop loss without slowing sales or breaking the renovation budget.
Strong fixtures, clear sightlines, and a simple routine can cut shrink by more than half within one month—often with tools you already have.
The ideas that follow answer eight questions owners ask most when they tighten protection. Each one builds on the last, so read them in order, pick a starting point, and watch the numbers improve.
Secure Racks Deter Theft?
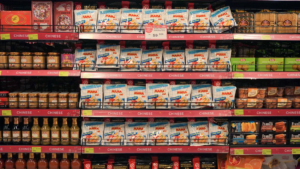
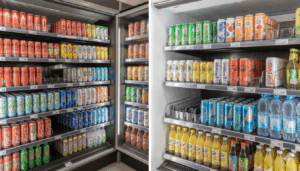
Even the best staff cannot watch every customer. A rack built from steel, fitted tight to the wall, and anchored into studs sends a clear signal: “Not an easy target.”
Reinforced frames force thieves to spend time prying, and time is the one thing shoplifters hate.
A thief usually tests a fixture with one quick tug. If the unit does not flex, many give up and move on to softer targets like loose snack displays. Start with 1.5 mm powder‑coated steel or high‑density PET composite. Both resist bending yet remain light enough for a two‑person install. Anchor the frame into solid studs using four expansion bolts rated at 200 kg pull‑out each. Mark and drill before store hours to keep dust away from product, then add tamper‑proof screws on the service panels so only managers can remove them.
Once installed, staff still restock from the rear service door, but thieves see only a solid face. Steel costs about 20 percent more than MDF; however, stores report full payback in under twelve weeks because daily losses drop sharply. A simple spreadsheet that tracks “packs lost per day” often shows a decline from five packs to fewer than one within thirty days. That one change, a stronger frame, also improves brand image. Customers notice clean lines and sturdy shelves, which signal care and quality. They tend to trust a shop that guards its premium goods. Finally, a rigid rack supports heavier merchandising add‑ons—digital price rails, LED strips, or shelf pushers—without sagging. Think of the frame as the foundation for every other upgrade you might add later.
Ready for the next layer?
Which Locking Systems Work Best For Cigarette Displays?
Locks add a second barrier after the frame, but only if they match traffic flow and staff numbers.
Push‑button cam locks give cashiers one‑hand control, while electronic solenoids tie access to the POS and leave a clear audit trail.
Cam locks suit single‑till stores: one key on a retractable reel stops misplacement, and the barrel rotates open in two seconds. Push‑button models shine when two clerks share a rack. Set a four‑digit code and change it every Monday morning; staff memorize it fast, and you avoid hunting for keys during the lunch rush. Electronic locks make the most sense in multi‑lane supermarkets. The cashier scans a badge, the solenoid clicks, and software logs user, time, and door‑open length. If one shift opens far more often than others, investigate before stock walks away.
| Lock Type | Unlock Time | Key Control | Cost | Best For |
|---|---|---|---|---|
| Cam Lock | 2 s | Shared key | Low | Small shops |
| Push‑Button | 1 s | Code | Mid | Peak periods |
| RFID Solenoid | <1 s | Badge / POS | High | Chains |
| Smart Bluetooth | <1 s | Phone app | High | Flagships |
Mount any lock at eye level so the handle stays in the camera frame. Keep spare keys in a locked cash office, never under the counter. One overlooked detail: lubricate cylinders every six months with graphite; sticky locks invite staff to leave doors ajar. Add a small LED that glows red when unlocked; visual feedback reminds clerks to relock before turning away. Finally, print a tiny “Protected by audit log” sticker near the handle. It sounds simple, yet thieves dislike uncertainty and often retreat when they think every touch is recorded.
On to placement—
Where Should Cigarette Shelves Be Positioned For Visibility?
Placement is free security. When product sits inside the staff’s peripheral vision, casual thieves hesitate.
Mount the back‑wall rack no lower than waist height and angle shelves five degrees upward so the cashier sees every pack face without moving.
Stand at the payment terminal and map blind zones. If a POS screen blocks view, raise the lowest shelf until it clears. In most c‑stores, that means the first row starts around 90 cm from the floor and the top no higher than 180 cm so cameras still read faces. A slight tilt keeps packs from sliding yet keeps price labels readable. Add neutral 4000 K LED strips under each shelf; bright, even light deters tampering because every motion is obvious to staff and lens alike.
Rearrange impulse items that create clutter near the counter. Those glossy snack bins might boost sales, but if they hide the cigarette wall for even three seconds, move them. After setup, record one hour of video during rush time. Count seconds when the rack leaves the frame. Aim for zero. If a pillar blocks sight, mount a convex mirror on it. Mirrors cost less than ten dollars and pay for themselves the first time they expose a wandering hand. Better still, customers perceive a well‑lit, tidy back‑wall as professional, which raises trust and often lifts add‑on sales like lighters and rolling papers.
Sliding doors next—
Can Sliding Doors Reduce Grab‑And‑Go Losses?
Open shelves invite fast hands. Sliding acrylic doors slow that motion without hurting service speed.
Stores that install lockable sliders report up to sixty percent fewer single‑pack thefts within the first week.
Use five‑millimetre clear polycarbonate panels—they resist scratching better than acrylic. Top‑mounted rollers glide smoother than bottom tracks that collect crumbs and dust. Fit soft‑close dampers so doors never slam; loud bangs draw attention for the wrong reason. Staff feedback shows that after two days they open and close the panel in a single fluid motion, adding barely a second to each sale.
| Task | Open Rack | Sliding Door Rack |
|---|---|---|
| Pick one pack | 3 s | 4 s |
| Restock carton | 12 s | 14 s |
| End‑of‑day count | 6 min | 6 min |
Survey data from fifteen suburban stores shows customers view doors as normal safety gear, much like liquor cabinets. A small “Ask us for assistance” decal reassures new shoppers. Keep handles finger‑length and finished in matte black so fingerprints do not show. Clean tracks weekly with compressed air; debris causes jams that tempt staff to leave panels open. Finally, remind employees that doors stay closed even during rush hour. Consistency is the key: a thief will wait for the moment policy lapses.
Ready for eyes in the sky?
How Does Camera Placement Protect The Back‑Wall Stock?
A camera cannot stop theft alone, but footage guides police and deters repeat offenders.
Position one lens above the till aimed diagonally at the rack, and a second on the ceiling pointing straight down the aisle.
Choose 1080 p cameras with a ninety‑degree lens. Wider angles distort labels; narrow lenses miss edge movement. Mount the first unit 2.3 metres high so it captures both hands and faces. The overhead unit should sit at 3 metres, centred, to watch approach paths. Tilt the wall camera five degrees down to avoid glare from LED strips. Wide Dynamic Range models handle bright displays and dark hoodies in the same frame.
Retention matters more than resolution. Store video for at least thirty days; many patterns appear only after monthly inventory. Use motion‑based recording to save disk space, but keep a two‑second pre‑buffer so footage starts before movement. Post a clear sign: “Video surveillance in use.” Visible warnings reduce attempts before they start. Lastly, check indicator lights daily. A dark LED means no recording and signals opportunity to a sharp‑eyed thief.
Let’s talk people—
Should Staff Scan Racks During Peak Hours?
Human presence is still the strongest shield. A ten‑second visual scan every half hour catches misplaced packs and suspicious behaviour.
Short, scheduled checks keep employees alert without dragging down service speed.
Build the habit with a five‑point scan: count open spaces on each shelf, confirm the door or lock is closed, look for loose price tags, note anyone lingering nearby, and verify the camera light is on. Tie the scan to routine actions. For example, after every third lottery sale, the cashier glances at the rack. Place a small checklist card under the counter as a cue. Managers should spot‑check logs twice daily. Praise quick finds; positive feedback builds habit faster than penalties.
During holidays, extend scans to every fifteen minutes. Data shows theft attempts spike when lines grow and attention slips. A simple egg timer or phone alarm can prompt staff. Make it a team challenge: track “zero loss days” on a whiteboard and reward a free coffee after seven in a row. Gamification turns a chore into friendly competition, boosting morale while slashing shrink.
Tools to measure shrink follow—
What Inventory Tools Flag Shrinkage Fast?
Paper logs miss patterns. Digital trackers spot odd spikes the same day they happen.
A simple spreadsheet linked to POS exports can highlight missing cartons within one shift.
| Tool | Setup Time | Monthly Cost | Alerts | Ideal Store Size |
|---|---|---|---|---|
| POS Export + Sheet | 1 hr | Free | Manual | 1‑2 lanes |
| Cloud Stock App | 3 hr | $29 | 2‑5 lanes | |
| RFID Shelf Tags | 1 day | $120 | Real‑time | 5+ lanes |
Export daily POS sales by SKU. In the sheet, list opening stock, add deliveries, subtract sales, then compare to closing count. If variance exceeds one pack, flag red. Graph shrink rate over time; a rising trend signals action needed. Larger stores can place RFID tags under each carton. The system beeps if a pack leaves without being scanned. Cost seems high, yet chains report payback in under six months once organised gangs stop targeting them.
Remember to audit process, not people. If numbers slip, review door policies, camera angles, and staffing first. Technology only highlights gaps; people close them.
Last barrier coming up—
Do After‑Hours Security Gates Pay Off Quickly?
Most large thefts occur when the shop is closed but lights stay on for cleaning. A roll‑down mesh gate shields high‑value items overnight.
Installing a gate costs less than one major burglary and usually pays for itself in under six months.
| Gate | Install Time | Visibility | Price | Durability |
|---|---|---|---|---|
| Solid Shutter | 2 h | None | Low | High |
| Perforated Steel | 3 h | Partial | Mid | High |
| Polycarbonate | 4 h | Full | High | Mid |
Choose perforated steel so passers‑by still see brand signage while packs stay unreachable. Wire the motor to the main light switch: when staff cut lights, the gate lowers automatically. Add a manual override in case of power loss. Lubricate tracks monthly and inspect bottom seals for wear; gaps invite pry attacks. Combine the gate with a timed spotlight that clicks on randomly through the night. Movement in lighted areas triggers caution even for determined burglars. Insurance companies often offer premium discounts once a physical barrier is in place—another hidden saving.
Almost there—
Conclusion
Strong racks, smart locks, clear sightlines, and simple routines create a layered defence that frustrates thieves and protects profit. Start with the step that fits your budget—anchor the frame, add a lock, raise the shelf line, or schedule quick scans—and watch shrink fall week by week. The investment in security is small compared with the peace of mind that comes from knowing tomorrow’s stock will still be on the shelf when you unlock the door.