Skip to content


You know the feeling: you open a cabinet and everything falls out. Your shelves hold a messy mix of items, so it’s hard to find anything. Store-bought organizers are often too expensive and never fit your space well. That’s where the DIY approach shines. You can create custom solutions that match your needs and style, including clever uses for shelf dividers to keep categories neatly separated. These projects range from simple, no-tool tricks to more complex builds. The good feeling of a perfectly organized shelf is worth the work. You’ll leave with practical diy home organizing ideas and the confidence to start today. Let’s look at these clever diy shelf divider ideas.
Key Takeaways
- Create custom shelf dividers from cardboard or wood. They cost less than store-bought options and match your exact space.
- Use tension rods or cardboard with binder clips for quick fixes. These no-cut hacks work great for renters.
- Paint, stain, or cover your dividers with fabric. Labels keep items easy to find.
- Avoid shelf sagging by spreading weight evenly. Choose strong materials for heavy items.
- Start with one simple project. You will gain confidence and organize more spaces.
Why DIY Shelf Dividers Are a Game Changer
The Cost and Customization Advantage
Store-bought organizers drain your wallet fast. Outfitting a pantry or closet with commercial dividers can cost a small fortune. DIY versions flip that math completely. You can build dividers from cardboard or foam board for free using leftover boxes, or spend just a few dollars per drawer on materials. One DIYer shared how custom wood dividers cost about $6 per drawer using one or two four-foot boards. Try matching that price with store-bought options that offer the same custom detail.
Customization matters just as much as cost. Store-bought dividers come in fixed sizes that rarely match your shelves. You end up with awkward gaps or wasted space. When you cut your own dividers, you create exact fits. No more searching for “just right” sizes. No more unused slots that collect dust. One person described how store-bought expandable dividers “lost all tension and would not stay put anymore.” Another complained about a utensil insert that “constantly opened up with the movement of the drawer.” After switching to custom DIY wood dividers, each section stayed perfectly in place and used every inch of space.
DIY also lets you match your decor. Paint, stain, or cover dividers with fabric to complement your room’s style. Store-bought plastic pieces often clash with warm wood or vintage aesthetics. Your handmade versions blend right in.
Choosing the Right Materials for Your Project
Material choice shapes your project’s success. Cardboard works for lightweight items like scarves or spice packets. Wrap it in contact paper for durability and a cleaner look. Foam board offers more rigidity while staying easy to cut with a craft knife. For heavier loads, use thin plywood or MDF boards cut to size.
Think about where your dividers will live. Kitchens need moisture-resistant materials. Closets can handle simpler options. Measure your shelf depth first, then choose materials that won’t sag under weight.
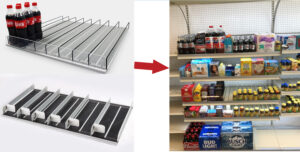
For a truly professional finish in a home office or retail space, consider commercial options. Brands like Nova-day offer high-quality PET dividers that provide a sleek, transparent look. These plastic shelf dividers resist chemicals and clean easily, making them perfect for demanding environments. They’re recyclable too, so eco-conscious organizers can feel good about the choice.
DIY remains ideal for personal projects where budget and style lead. But when you need durability and polish at scale, professional dividers deliver results that handmade versions can’t match. Combine both approaches for the best of every world.
Easy No-Cut DIY Shelf Dividers

Not everyone has a saw or wants to put holes in rental walls. You can still fix messy shelves without any power tools. These no-cut projects take just minutes to set up. They leave no permanent marks behind. Landlords stay happy, and you get order right away. Best of all, you likely own most of the supplies already. Let’s look at two smart ways that give big results with zero cutting.
Using Tension Rods for Quick Separation
Tension rods fix a common kitchen issue. You know the problem: cutting boards and baking sheets slide into one big pile. Getting the one you need means pulling everything out first. A tension rod changes that completely.
Here’s how it works. You place the rod between two cabinet shelves or between a shelf and the cabinet wall. The spring-loaded ends grip tight without screws or brackets. This makes a narrow vertical slot that holds flat items upright. Cutting boards stand like books on a shelf. Baking sheets stay apart and easy to see. You grab what you need without moving the rest.
This trick works because it uses space you already have. Items no longer stack flat and hide under each other. The empty space above each board becomes useful storage. You use every inch of cabinet height. Tension rods cost a few dollars at any hardware store. They adjust to fit different widths, so one rod works in many spots. Move them around as your needs change. This makes them great for renters who want flexible options.
Try this trick in other rooms too. Use a tension rod in a linen closet to sort towels by size. Place one in a pantry to keep baking trays upright. The same simple idea works anywhere flat items collect.
Repurposing Cardboard and Binder Clips
Cardboard boxes pile up fast in any home. Before you recycle them, think about their organizing power. A sturdy cardboard divider costs nothing and works well for light items.
The key is building it right. Use double-thickness corrugated cardboard for extra strength. Cut it to fit your shelf width and depth. Then wrap the whole piece in contact paper. This layer protects against moisture and gives the divider a clean look. The contact paper also makes dusting easy.
This method suits light items like t-shirts, scarves, and linens. Folded clothes stay neat in drawers or on closet shelves. You can make custom sections that match your exact storage needs. Binder clips add another useful feature. Clip them along the top edge of your cardboard divider to create adjustable slots. Move the clips whenever your storage needs change.
Be realistic about limits though. This DIY fix works only for light loads. Heavy books, cast-iron cookware, or dense tools will bend the cardboard fast. Humid places like bathrooms and kitchens also shorten its life. Moisture in the air weakens even contact-paper-covered cardboard over time. Expect to replace these dividers every 6 to 12 months. That trade-off feels fair when the cost is zero.
For a more permanent setup, think about upgrading to plastic shelf dividers from a brand like Nova-day. Their PET versions resist moisture and hold heavier items without sagging. But for quick wins and budget-friendly organizing, cardboard gives instant results.
These no-cut projects build confidence for bigger DIY organizing projects. Start with one shelf and see how good it feels. You will likely find yourself looking for more spaces to organize. That momentum turns small wins into whole-home changes. The best part? You spent almost nothing and made exactly what your space needed. These simple ideas show that good organizing does not need expensive tools or hard plans.
Creative DIY Divider Ideas for Every Shelf
You now know the basics. It’s time to try creative DIY projects that fit each room. Different spaces need different answers. A pantry shelf holds cans and jars. A closet shelf stacks sweaters and bags. An office shelf stores files and supplies. Each spot needs its own plan. These ideas will spark your creativity and help you fix every part of your home.
Plastic Dividers for a Sturdy, Built-In Look
Sometimes you want more than a quick fix. You want dividers that seem built into the shelf. Plastic dividers give that clean, lasting look. You can buy clear acrylic sheets and cut them to fit. Then attach them with sticky strips or small brackets. The result looks neat and professional. Your items stay apart without messy clutter.
This method works great in a pantry. Cans roll around without proper separation. A strong plastic divider keeps each row tidy. You can see every label easily. No more buying extra spices because you forgot what you had. The same trick helps in a linen closet. Stack towels in neat piles that stay in place. Grab one without moving the rest.
For a home office or craft room, think about store-bought options. Nova-day’s Plastic PET Shelf Dividers offer a strong, clear, and recyclable choice. These dividers look nice and wipe clean quickly. Their clear design lets you see items right away. You search and touch things less often. The material also resists chemicals, so it works well in spaces with paints or cleaning supplies.
Here’s what makes PET dividers special:
| Feature | Sustainability & Organization Benefit |
|---|---|
| Clarity | Lets you see products easily, so you search and handle items less. |
| Eco-friendliness | PET is safe for nature and can be recycled, helping a greener lifestyle. |
| Durability | Long-lasting dividers mean fewer replacements and less waste. |
These dividers attach to shelves with T-rails. They snap into place along the front and end edges. You get a strong barrier that won’t move during daily use. Pick different heights to match your storage needs. The clear look fits any decor style. You barely see the divider, only the neat rows it makes.
Upcycled Items for Unique Storage
Your recycling bin holds hidden organizing treasures. Look around before buying anything new. Old picture frames make lovely dividers. Take out the backing and glass. Then use the frame as a pretty separator on a shelf. Paint it to match your room. This works well for showing folded handbags or hats.
Wooden crates from fruit shipments stack and divide with rustic charm. Turn them sideways to create cubbies. Each cubby holds a different type of item. This idea shines in a walk-in closet. Sort shoes in one cubby, belts in another, and scarves in a third. The open design keeps everything visible and easy to reach.
Wine boxes with their divided insides work great for small accessories. Use them on office shelves to sort cables, chargers, and USB drives. The strong cardboard lasts for years with gentle use. Cover them with wrapping paper or fabric for a custom look.
Baskets with handles act as removable dividers. Place several on a shelf to create natural sections. Each basket holds a different category. You can lift the whole basket out when you need something. This makes kitchen organizing ideas simple. Group spices in one basket, tea packets in another, and baking supplies in a third.
For closet organizing ideas, try hanging fabric bins on shelf rods. These soft containers divide vertical space without permanent setup. Use them for socks, underwear, or accessories. The fabric keeps items dust-free while staying breathable.
The beauty of upcycled dividers comes from their uniqueness. No two look exactly the same. Your shelves show your personality and creativity. You save money while cutting waste. Every piece tells a story. That old frame from grandma’s house now keeps your purses upright. That wine box from your favorite vineyard sorts your desk supplies.
Start with one shelf and experiment. Mix plastic dividers with upcycled pieces. Combine sturdy store-bought options with handmade touches. Your closet, pantry, and office will thank you. The best organizing system fits your habits and your style. These ideas give you a starting point. Now make them your own.
DIY Shelf Divider Ideas

Building a Dual-Purpose Divider Shelf
Living in a studio apartment or an open floor plan often means one space must serve many roles. You might need a bedroom corner, a home office nook, and a living area all in the same room. A bookcase room divider solves this problem beautifully. It splits the space visually while giving you valuable storage. You get two wins from one piece of furniture.
Start with a sturdy bookcase that reaches near the ceiling. Taller units create a stronger visual barrier. Place it perpendicular to a wall to separate your sleeping area from your workspace. The back of the bookcase faces one side, and the open shelves face the other. You can also use two shorter bookcases side by side for a wider divide. Anchor them to the wall for safety, especially in homes with kids or pets.
Once your bookcase room divider stands in place, organize both sides with the diy hacks you learned earlier. Use tension rods on one shelf to hold files upright for your office zone. Add cardboard dividers wrapped in contact paper to sort craft supplies or accessories. The key is treating each side as its own storage zone. One side serves your work needs. The other side handles bedroom or living room items.
Styling Both Sides of Your Divider
The beauty of a bookcase room divider lies in its two faces. Each side can look completely different while serving its own purpose. The side facing your bed might hold folded sweaters and linens. The side facing your desk keeps books, notebooks, and tech gear within reach. This dual approach maximizes every inch of your small spaces.
Think about visual balance as you style each side. Place heavier items on lower shelves to keep the unit stable. Use baskets to hide clutter and create a clean look. Add a small plant or framed photo on a middle shelf to break up the monotony. The back panel of the bookcase can hold command hooks for lightweight items like keys or headphones.
For the bedroom side, install plastic shelf dividers to keep stacks of clothes neat. You can also use upcycled wine boxes to sort socks and belts. On the office side, use tension rods vertically to separate binders and folders. This closet organizing trick works just as well for office supplies as it does for clothing.
Remember that your bookcase room divider should look good from both angles. Step back and check each side regularly. Rearrange items until the whole setup feels intentional. With a little effort, your diy project becomes a stunning focal point that also keeps your home organized. The dual-purpose design proves that smart storage ideas can transform how you live in any space.
Customizing Your Dividers to Match Your Decor
You built your dividers. Now make them look like they belong. A raw piece of wood or plain cardboard can feel unfinished. A few finishing touches change that completely. Your DIY projects deserve to look intentional, not makeshift. The right finish ties your storage solution into the whole room. This step turns function into style.
Painting, Staining, and Covering with Fabric
Paint transforms cheap materials into custom pieces. Start with sanding. Use 220-grit sandpaper on all surfaces. Paint cannot hide flaws, so this step matters. Apply a high-quality latex primer next. It seals the wood and stops blotchy color. Brush detailed areas first, then roll flat surfaces. Let the primer dry fully.
Sand again after priming. Use 400-grit sandpaper by hand. This removes raised grain and makes a smooth base. Fill any gaps with paintable trim caulk for a clean look. Then paint with 2-3 thin coats. Sand lightly between coats with 400-grit paper. Skip sanding after the final coat. Let everything cure fully before use.
Staining offers a warmer choice. Pick a wood stain that matches your existing furniture. Apply with a clean cloth in smooth strokes. Wipe off extra for lighter tones. Add a clear polyurethane coat for protection.
Fabric covering works well for cardboard dividers. Cut fabric slightly larger than your piece. Apply spray adhesive to the divider surface. Smooth the fabric carefully to avoid bubbles. Wrap edges around the back and secure with hot glue. This softens the look and adds texture to any closet.
For a minimalist or modern look, skip the fuss entirely. Professional dividers from Nova-day offer a clean, clear style. Their PET material blends with any color scheme. You see the organization, not the divider itself. This works for DIY fans who want pro results without extra work.
Adding Labels for a Polished and Functional Finish
Labels boost your organizing game. They show you exactly where things belong. No more guessing which stack holds winter scarves. No more opening three containers to find batteries. A clear label system saves time every day.
Use a label maker for crisp, even text. Print category names like “T-shirts” or “Craft Supplies.” Stick them on the front edge of each divider. Place them at eye level for easy reading. Chalkboard labels offer flexibility. Write with chalk, erase, and rewrite as needs change. This works well in pantries where contents shift often.
Handwritten tags add charm to rustic decor. Write on kraft paper tags and tie them with twine. Attach them to basket handles or divider edges. This personal touch makes your DIY ideas feel curated, not messy.
Try color-coding for visual organization. Give each family member a color. Use colored washi tape strips on dividers in their closet sections. Kids learn fast which shelf holds their items. This simple system builds independence and keeps spaces tidy.
Labels also help keep your system working long-term. When everything has a home, putting things away becomes automatic. You stop making piles because you know where each item lives. This steady habit turns your organizing work into lasting routines.
Your room divider project benefits from labels too. Mark each side clearly. One side says “Office,” the other says “Bedroom.” This strengthens the visual split and keeps both areas useful. The dual-purpose design works better when you stick to its plan.
Take time to finish your dividers properly. The extra effort pays off every time you open a cabinet or walk past your shelves. Beautiful, labeled dividers make you smile. They prove that DIY projects can look store-bought while costing a fraction of the price.
Common DIY Divider Mistakes to Avoid
Even the best diy plans can fail. You might build a perfect-looking diy divider only to find it sagging after a few weeks. Or you spend hours on a complex project that never gets finished. Before you start, know these common pitfalls. They are easy to fix once you see them.
Ignoring Weight Limits and Shelf Stability
You build a beautiful diy shelf divider. You fill the shelf with books or canned goods. Weeks later, you notice a slight dip in the middle. That dip grows over time. This happens because you ignored weight limits. Your shelf can only hold so much before it starts to sag.
The problem gets worse with longer shelves. Check the realistic weight capacity for a solid hardwood shelf that is 1.5 inches thick:
| Shelf Length | Realistic Weight Capacity |
|---|---|
| 24 inches | 40–60 lbs |
| 36 inches | 30–50 lbs |
| 48 inches | 25–40 lbs |
The 36‑inch shelf, a common standard size, averages 30–50 pounds. Know your shelf length and its true limit before loading it up with heavy storage.
A shelf sags in two stages. Initial small sag under load increases gradually as weight accumulates over years because wood slowly changes shape under a load—this phenomenon is called “creep.” Ignoring weight limits accelerates this long‑term sag.
Center‑loading makes sag worse. When you place heavy items at the middle of a shelf, the bending force increases significantly. Spreading weight evenly across the shelf reduces that stress by about 40%. Think about that when you organize your closet shelves. Distribute heavy sweaters or storage bins across the whole span. Good diy organizing means planning for real-world weight, whether in a pantry or closet.
Overcomplicating the Design and Build Process
Many diy organizers fall into a trap. They try to build something too complex. A divider with intricate joinery or moving parts sounds impressive. But it often leads to frustration and unfinished projects. The best diy ideas stay simple.
Start with your shelf depth. Measure it before you cut anything. A common mistake is building a diy divider that sticks out past the shelf edge or leaves a gap at the back. Those errors waste time and material. You end up starting over.
Keep your first project basic. Use tension rods or cardboard dividers wrapped in contact paper. These quick wins build confidence. Skip the complicated plans for now. You can always upgrade later. The goal is getting organized today, not building a masterpiece next month.
Over‑engineering also costs more. You spend money on special tools and premium materials. Then the project sits half-finished in your garage. Simple diy organizing solutions work just as well and get done in an afternoon. That momentum carries you to the next project. Remember these tips next time you gather organizing ideas for a new room.
You now have a full toolkit of DIY projects to tackle any shelf in your home. Each idea helps you build confidence, whether you start with a tension rod or a full bookcase room divider. The real reward comes from the process itself. You learn new skills and see your space transform piece by piece. Start with one small DIY project today. Your closet or pantry will thank you. A tidy closet makes every morning smoother and saves precious time. Share your DIY shelf divider creations in the comments below. We love hearing your organizing success stories and organizing challenges. Remember, you have the power to create order in your home, one shelf at a time.
FAQ
What’s the best material for DIY shelf dividers?
Cardboard works for light items like scarves or spice packets. Foam board offers more rigidity. Thin plywood handles heavier loads. Think about your shelf’s location first. Kitchens need moisture-resistant materials. Closets can handle simpler options. Match your material to what you plan to store.
How do I keep my dividers from sagging?
Spread weight evenly across the whole shelf. Avoid placing heavy items in the center. Check your shelf length before loading. Longer shelves need more support. Use sturdy materials for heavy storage. Cardboard bends under dense items like books or tools. Choose plastic or wood for those spots.
Can I use these hacks if I rent my home?
Yes. Tension rods and cardboard dividers leave no permanent marks. They install without screws or brackets. You can remove them easily when you move out. These no-cut projects keep your security deposit safe. Start with these options if you cannot modify your space.
When should I buy commercial dividers instead of making my own?
Choose store-bought dividers for high-moisture areas or heavy daily use. Nova-day’s PET shelf dividers resist chemicals and clean easily. They snap onto T-rails for a secure fit. Their clear design works in any decor. DIY suits personal projects where budget and style lead.
How do I measure my shelf before building dividers?
Measure the depth from front to back first. Then measure the width between shelf supports. Write both numbers down. Add a small gap for easy removal. Cut your divider slightly smaller than your measurement. This prevents sticking and makes installation simple.